If you’re reading this, then hopefully you’re up for giving an asparagus bed a go this year, ready to reap the rewards for many years to come. Here’s how to get started…
WHICH ONES AND HOW MANY?
First thing’s first. You need to choose which asparagus variety/varieties to grow and how many you’d like to grow (the numbers will dictate the size of your asparagus plot). We have three types available. If you live up north or in a particularly cold part of the country, then the Guelph Millennium Asparagus Crowns are a no-brainer. They are specifically designed to thrive in colder climates.
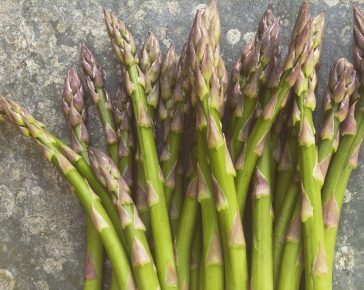
For an early harvest, the Ariane Asparagus Crowns are the ones to pick. For taste, the Pacific 2000 are the kings of the asparagus world. If you can, we highly recommend growing both varieties to keep you going for longer in the season.
(Just to help you decide on numbers…All our asparagus crowns come in sets of 5. Each crown needs about 45cm growing space and will produce approximately 25 spears each season.)
HOW TO PREPARE THE BED (for 5 asparagus crowns)
This bit always sounds more complicated than it is. So let us break it down and make it easy.
1. Make a weed-free bed (1.5m long x 1m wide)
Your asparagus crowns will need to be planted in a sunny spot in a completely weed-free bed. Dig it over well, pulling out any weeds as you go along.
2. Dig 2 trenches
The trenches should run down the entire length of the bed measuring 30cm wide and 20cm deep.
3. Add a layer of compost
Fill the bottom of each trench with a 10cm layer of compost or well rotted manure.
4. Create a ridge
Use some of the soil that you dug up from the trenches to form a ridge running lengthways down the centre of each trench. This ridge should be 10cm high.
5. Place the asparagus crowns
Place each asparagus crown 45cm apart along the top of the ridge. (You could squeeze them in 30cm apart if you’re short on space) It’s best to stagger them between rows rather than planting side-by-side.
6. Arrange the roots
Gently arrange the roots of each asparagus crown so that they are spread out evenly and trail down the sides of the ridge.
7. Cover the asparagus with soil
Use the excavated soil to cover up the asparagus leaving just the very tips visible.
TOP TIP: Do stages 1 to 4 before your plants arrive so that you’re ready as your asparagus crowns will want to be planted asap on arrival!
HOW TO LOOK AFTER YOUR ASPARAGUS PLANTS:
Every spring, in March, give them a liquid feed.
During spring and summer, keep them watered and thoroughly weeded.
TOP TIP: Weed by hand, not with a hoe, as this will prevent you from damaging the plants.
In late autumn, cut off any yellowing foliage and add a nice mulch around the base of the plants.
WHEN TO HARVEST YOUR ASPARAGUS:
Year 1 – Not yet!! Patience is a virtue. Your asparagus will be much better off if you leave it another year or two to grow strong and healthy.
Year 2 – If you must. You can harvest a few spears, but it’ll be better if you can bear to wait one more year.
Year 3 – Go, go, GO! In April/May you can merrily harvest your asparagus spears by cutting off at the base. It’s best to stop harvesting by the end of May so that you get a good crop the following year as well.
Years 4 onwards – Keep going (see year 3.)